Important Information
Before the install/reinstallation of Windows XP, I highly recommend that you download Service Pack 3 “for multiple computers”and burn it onto a CD. The download is approximately 316.4MB. If you choose not to do this step, your system could become infected with a virus or worm exploiting the vulnerabilities that Service Pack 3 fixes. I also recommend that you do NOT have your system connected to the Internet until after the installation of Service Pack 3. This means that you cannot activate your XP installation during setup, but you can accomplish that task following a reboot after Service Pack 3 is installed.
1. Insert the Bootable winxp disc and make sure your first boot device is set to CD/DVD drive, once CD start to run you will prompted to press any key to boot from CD/DVD now press enter.

2.After configuring the system for booting from a CD, the Windows Setup screen appears,At this point Setup is loading the driver files it needs to continue with installation.

3. The “Welcome to Setup” screen appears with the option of Continuing Setup, Repair a previous installation, or Quitting,Press ENTER to Continue Setup.You may also choose R to Repair, or F3 to Quit and reboot the system.

4.The “Windows XP Licensing Agreement” screen, otherwise known as “EULA,” displays the legal in’s and out’s of this particular software package,You may press F8 to signify that you agree with the terms, hit ESC if you do not agree and PAGE UP or PAGE DOWN to scroll through each screen. Note: If you do not agree to the terms, setup will quit and reboot the system.

5.Hard drive partition information is now displayed. This varies with each systems hardware configuration.This example already has a partition defined. I will choose not to use this and create a new one by pressing D.You may skip this and the next few steps if you do not have any partitions defined.At this point, the options include pressing ENTER to Install on the selected partition, D to Delete the selected partition, or F3 to Quit and reboot the system.

6. After pressing D to delete the selected partition, a warning screen appears explaining the pitfalls of deleting it. This particular screen only appears when the partition selected to be deleted is formatted as a bootable system partition. Other partitions will display the next screen.I want this to happen, so I press ENTER to continue.The options include pressing ENTER to continue, or ESC to Cancel.

7. A confirmation screen that displays the logical drive, what file system the partition is currently using, the size in MB and controller information.Options include L to Delete the partition and ESC to Cancel the action.

8. If no partitions have been previously defined, this screen will be displayed. You may section your hard drive in as many partitions as you wish by selecting C to Create a Partition and then entering in a value less then the total available. Here, I will Create a Partition in the highlighted, unused portion.Select the partition you wish to install to using the UP arrow and DOWN ARROW keys.Press ENTER to use the highlighted partition and Install, C to Create a Partition, or F3 to Quit and reboot the system.

9. Enter in the partition size in MB within the displayed minimum and maximum. I chose the default or maximum available here.You may choose ENTER to Create the new partition or ESC to Cancel the action.

10. Continue to create partitions until all space is used or the configuration meets your requirements.Note: a small portion will be unavailable to partition. This is normal. In this example, it is 2 MB.I chose drive C: or Partition1 to install the Operating System.You may choose ENTER to Install to the selected partition, D to Delete the highlighted Partition, or F3 to Quit and reboot the system.

11. Since this OS supports NTFS, format the partition with it. If you do not, many folder and file security features will be unavailable. Note: If you are dual booting your system, a previous OS will not be able to read the local information. This is a fact with Windows 9x and Me. If you have a requirement to view this partition from another OS installed on the system, do not format it as NTFS. Also, the boot partition must be formatted with FAT32 if you wish to dual boot. I have found no problems accessing a NTFS partition mapped as a network drive from an older OS.Select what format you wish to use by pressing the UP ARROW and DOWN ARROW keys.Press ENTER to confirm your selection and Continue or ESC to Cancel.

12. Watch the progress bar as Setup formats the partition, or get up and get a soda. It may take a while.

13. Setup is now figuring out what files to copy over to the hard drive.

14. After the partition is finished formatting, Setup copies various files to support booting from the hard drive and continue on.

15. Setup then creates various information files required to continue on with setup.

16. The first reboot and the end of the blue background has arrived. If you are impatient, press ENTER to Restart before the 15 seconds expire.ENTER to Restart the Computer is the only option available.

17. The new Windows XP boot screen is displayed.

18. If you have installed Windows before, this type of screen will look familiar,Sit back It may be awhile.

19. A little while later, you will be prompted with options of configuring your Region and Input Languages. The default was fine for me, so I selected Next,Options include Customize button, Details Button, plus the standard Back and Next.

20. Enter in your Name and optional Organization information, then select the Next button.

21. Thought you could get away from it? Think againEnter your unique 25 digit Product Key that came with your CD, then select the Next button.

22. The “suggested” name for the computer is always really whacked out. Choose one that meets your needs.Enter an Administrator Password now. It is VERY IMPORTANT that you keep this information safe and remember what it is! “01Pa$$word” is not a good choice. Think of something secure and never lose or forget it.

23.Configure the proper information for the Date, Time and Time Zone here.

24.Wait here while the Network is installing. You could read all the marketing dribble.

25.The Network Settings Dialog is next. Under usual circumstances, the Typical settings are fine, but I never choose them so I can poke around under the hood. I selected Custom settings here.Choose your method and select the Next button.

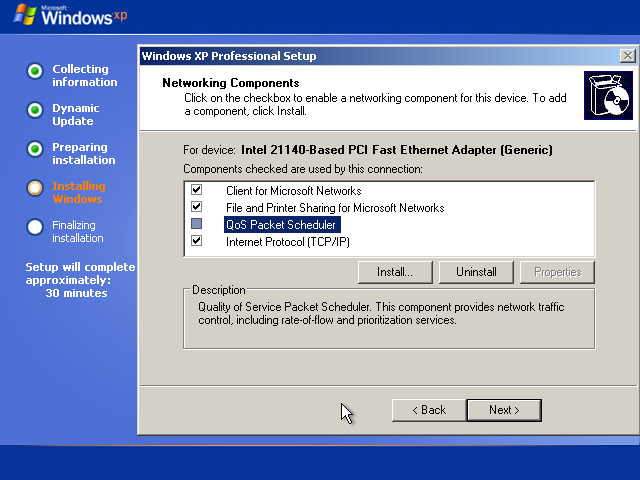
26. In the Custom settings, many options are abound. I cannot go into all of them here, but I will hit on the high points.

27. QoS Packet Scheduler is not required unless your network uses it.For this system, I will choose to uncheck it.
28. TCP/IP Properties contains the standard options. Adjust them for your particular needs as required. For now, I kept the default settings. Basically, it is using DHCP to configure TCP/IP. If you are using a static IP address, enter in the proper information here,Select the Advanced button to further configure your TCP/IP options.

29.Workgroup or Computer Domain, that is the question. I am not going to set up this system to connect to a domain controller, so I will place it as a member of a workgroup,Please, change “WORKGROUP” to something else.Select the Next button after making your choice.

30. The system will reboot after all files have been copied over to the install partition. Now may be a good time to take a break. It may be awhile.

31. The moment we have been waiting for, Windows XP Professional is starting up “for the first time.” Remember that quoted statement with Windows 95 setup?
32. Windows XP no longer likes the “default” resolution of 640 x 480 and prompts you of that fact.Select OK to continue.

33. 800 x 600 is a wonderful thing, however, I chose to have it time out and return to 640 x 480 for this guide.

34. With the “Welcome” screen, you no longer have to hit the combination of Ctrl+Alt+Delete to login to the Administrator account,You did remember your password, right?!?

35. Please wait while the Administrator account is configured “for the first time.

36. All done you windows xp is now installed. you'll see the following screen. Happy windowing.

